Table of Contents
Custom patches come in a lot of different styles. At VeperPins, you can choose from embroidered, woven, printed, PVC, and several other options, with embroidered patches being one of the most popular.
But once you’ve picked the patch style, there’s usually another question: What kind of backing should you choose?
Iron-on, Velcro, sew-on, adhesive—each option works a little differently and is better suited for certain clothing, gear, or uses. Choosing the wrong one can make the patch harder to attach or less practical for how you plan to use it.
In this guide, we’ll walk through 8 common patch backing options, what each one is best for, and the pros and cons to consider, so you can choose the right backing for your project.
8 Patch Backing Options You Can Choose From

1. No Backing
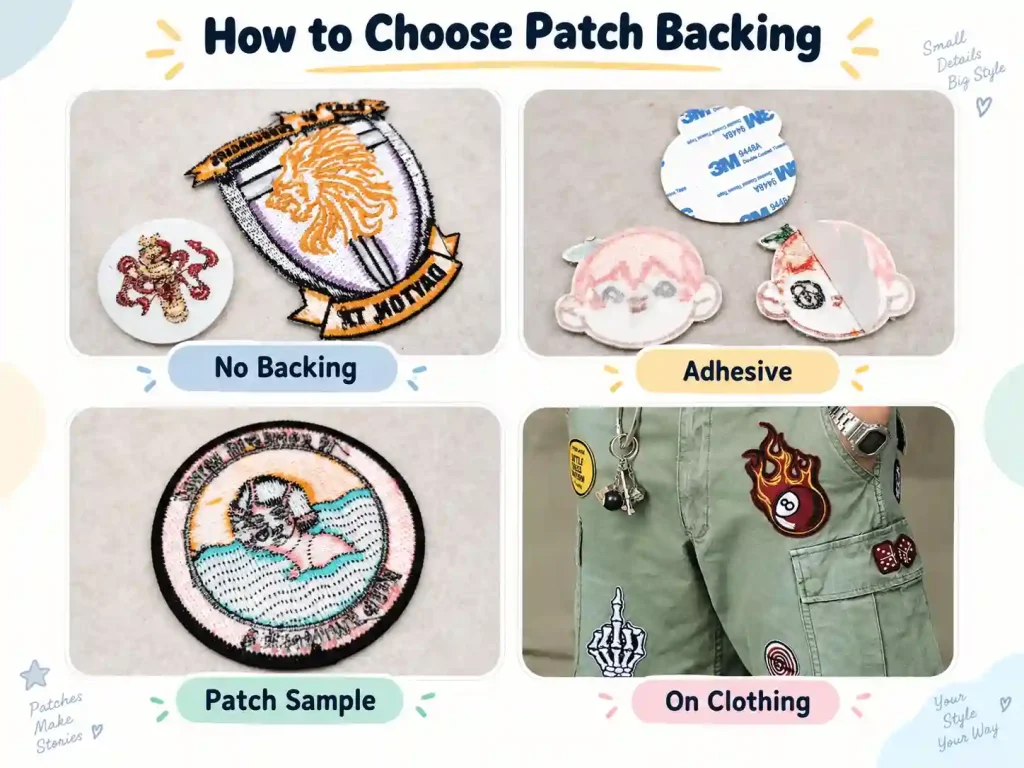
No backing keeps the patch in its most natural form. Nothing extra is added to the back, so you can still see the fabric base and the embroidery stitches.
It’s a simple, flexible option for patches that will be permanently sewn in place. It works especially well on clothing, fabric bags, and other textile items where stitching is already part of the plan.
Best for: Garment production, uniforms, DIY projects, fabric bags, and other sew-on applications.

2. Iron-On Backing
Iron-on backing adds a heat-activated adhesive layer to the back of the patch. Apply heat with an iron or heat press, and the adhesive melts and bonds to the fabric.
It’s a good choice if you want a clean, secure attachment without sewing. Once applied properly, the patch sits flat against the fabric without changing the look of the embroidery on the front.
Best for: Denim jackets, cotton clothing, canvas bags, and other smooth, heat-safe fabrics.

3. Adhesive Backing
Adhesive backing is all about convenience. We can use 3M adhesive or standard double-sided adhesive, depending on the project.
Just peel off the protective liner and press the patch onto the surface. No heat and no sewing needed. It works well on smooth, hard surfaces like phone cases, notebooks, laptops, tumblers, and some bags, making it a handy option for temporary decoration or quick use.
Best for: Phone cases, notebooks, laptops, tumblers, packaging, displays, and other smooth surfaces.

4. Hook Backing
Hook backing is the rough side of hook-and-loop fastener, with small hooks across the surface. It’s commonly used for tactical patches, name tapes, and morale patches.
Many uniforms, tactical bags, hats, and pieces of gear already have a soft loop panel built in. If yours does, hook backing on the patch is all you need.
It also makes patches easy to remove and replace, which is useful for names, ranks, units, job titles, or designs that change regularly.
If your gear doesn’t have a loop panel, hook backing by itself won’t stay in place. The exposed hooks can also catch on sweaters, knits, and other soft fabrics.
Best for: Tactical patches, name tapes, military and police patches, morale patches, outdoor bags, PVC patches, and patches that need to be changed often.
If your gear already has a loop panel, hook backing is usually enough.

5. Loop
Loop is the soft side of a hook-and-loop system and is designed to pair with hook material.
In most cases, loop is sewn onto clothing, uniforms, bags, or gear rather than added to the back of the patch itself.
For example, if your jacket doesn’t already have a hook-and-loop area, you can sew a piece of loop onto it. Any patch with hook backing can then be attached, removed, and swapped out whenever needed.
Loop works more like the base that your hook-backed patches attach to. Using it as the actual patch backing is much less common.
Best for: Uniforms, backpacks, tactical gear, and products that need a dedicated area for interchangeable patches.

6. Hook & Loop
If your clothing or gear doesn’t already have a hook-and-loop panel but you still want the patch to be removable, Hook & Loop gives you both pieces.
The patch comes with hook backing, along with a matching piece of loop. Sew the loop piece onto the garment, bag, or gear first, then attach the patch.
This way, you don’t have to find a separate loop panel that matches the size of your patch, and you can easily swap patches later.
If your uniform or backpack already has a loop panel, you usually only need hook backing.
Best for: Removable sleeve patches, tactical gear, uniforms, workwear, and items that don’t already have a hook-and-loop area.

7. Safety Pin Backing
Safety pin backing is useful when the patch only needs to be worn temporarily.
A safety pin is attached to the back, so the patch can be pinned directly to a jacket, shirt, or bag without ironing or permanently sewing it in place.
It works well for events, trade shows, parties, and souvenir patches that may only be worn a few times.
Because the pin has to go through the fabric, it’s not a good choice for silk, very thin T-shirts, or materials that can easily show pinholes. Larger or heavier patches may also sag or rotate while being worn.
Best for: Event patches, souvenirs, trade show giveaways, jackets, bags, and other temporary-wear projects.

8. Key Ring
A key ring isn’t technically a patch backing. Instead, it turns the patch into a small hanging accessory.
A metal ring or connector is added to the top of the patch, so it can hang from keys, backpacks, zippers, or other everyday items.
This works especially well with smaller embroidered or woven patches and is a good option for branded merchandise, event giveaways, and souvenirs.
Larger patches can feel bulky when used this way, so key rings usually work best with small to medium-sized designs.
Best for: Branded merchandise, event giveaways, souvenirs, backpack charms, and keychains.
Common Mistakes When Choosing a Patch Backing
Denim and cotton are usually fine, but nylon, waterproof fabrics, and some synthetics don’t handle heat well. Check the care label before you iron anything on.
Uniforms and workwear get worn and washed often, so iron-on adhesive can start lifting around the edges over time. A few stitches around the border will help it stay put.
Hook backing won’t stick directly to regular fabric. If your backpack or uniform doesn’t already have a loop panel, hook backing by itself won’t do much.
It’s handy for events, displays, and packaging, but it’s not a great choice for clothing that gets bent, rubbed, and washed all the time.
Safety pins and key rings work well on smaller patches. Once the patch gets too large or heavy, it can sag, twist, or just feel awkward to use.
Choose a Backing That Fits the Way You’ll Use It
There isn’t one backing that works best for every patch. It really depends on where the patch is going and how it will be used. A work uniform, tactical bag, event giveaway, and display piece all have different needs.
As a custom patch supplier, VeperPins offers a range of patch styles and backing options. If you’re not sure which one fits your project, just get in touch. Tell us how you plan to use the patch, and our team can point you toward the option that makes the most sense.